Loading...
Loading...
Loading...
Loading...
Loading...
Loading...
Loading...
Loading...
Loading...
Loading...
Loading...
Loading...
Loading...
Loading...
Loading...
Like react-router or Next.js file system based route.
Depending on the framework or routing library you are using, links between pages are not handled the same way.
Usually, you'll have a <Link /> component provided by your routing library of choice. You need to let react-dsfr know about it so that whenever a link is needed in a DSFR component, you can provide the correct props for your <Link /> component.
When registering your Link component, its props type will propagate to the react-dsfr API.
Examples
Client side routing
The <Link /> component from react-router will be used.
External links:
When react-dsfr detects that the href points to an external website it will use a regular <a/> instead of the <Link /> component.
Mailto links
Same goes for the mailto links.
Converting a link to a button
React-dsfr will automatically convert the underlying HTML element into a <button /> that looks like a link for better Accessibility.
After that you will have type safety on the linkProps, you can use the to property as you would on the react router's <Link /> component!
Note that if you want to link to external website (or use mailto:) you can use the href property instead of the to property (see below).
If you have a link that is a mailto: or a link to an external page, use the href property instead of to. Example:
In consequence there isn't anything to setup.
Examples
Client side routing
Examples
Client side routing
The <Link /> component from react-router will be used.
External links:
When react-dsfr detects that the to points to an external website it will use a regular <a/> Instead of the <Link /> component.
Mailto links
Same goes for the mailto links.
Converting a link to a button
React-dsfr will automatically convert the underlying HTML element into a <button /> that looks like a link for better Accessibility.
You should be able to infer what needs to be done refering to the react-router instructions.
If the library you are using doesn't export a <Link /> (like type-route for example) component, there isn't anything to do.
This is how you are instructed to set it up by default (no change from the guide)
Example .
Due to the fact that is also implementing module augmentation it's just a tiny bit less straight forward to set up but it works great!
unlike most routing library doesn't export a <Link /> component, <a /> are used directly.
Example .
If you are starting a new project you might want to use in place of as it is, at least in my opignion a much better routing library.
Everywhere a DSFR component accepts a xxxLinkProps you are expected to provide an object with a to property because react-router's<Link /> component expects a to prop instead of the typical href.
You can find an example .
You can't apply your custom classes using fr.cx(), you'll get type error, but you can combine a regular cx() or clsx() function and fr.cx(). Example:
The components are documented individually on a separate website.
What to do if you want to customize the components beyond what the props allow.
classes propertyEvery component of react-dsfr accepts an optional classes property that enables you to customize their look at a fine grained level.
Most of the time, when using the provided components from the Design System for French Republic (DSFR), there is no need to explicitly manipulate colors. These components are designed with a set of default colors that aim to maintain consistency and harmony across your application or website. However, when you are crafting a new component or customizing existing ones, it becomes essential to select the appropriate color scheme that aligns with the DSFR guidelines for your specific use case.
To assist you in effortlessly navigating through the DSFR color palette and selecting the perfect hues for your components, we provide you with a user-friendly color picker tool. This tool is designed to simplify the process of choosing colors that adhere to the DSFR’s design principles, ensuring that your custom components not only look visually appealing but also maintain a cohesive and unified design language.
You can go and search for a keyword:
When you find something fitting, you can copy paste the class name ( starting with ri- ) and use it anywhere you would have used a .fr-icon-xxxx ! 🚀
Example:
No need to worry about importing the correct icons file.
It's done automatically for you when you.
The fr.cx() utility is also handy for autocompleting the icons that are supported:
It's like but you can only pass it classes that are from the dsfr.
Icons just work, you can copy paste any code from and expect things to work.
Whenever you add a new icon to your project, restart your local server. This will launch the npx react-dsfr update-icons script configured in the (else you'll see a blue square instead of your icon).
But on top of that, all icons from are supported.
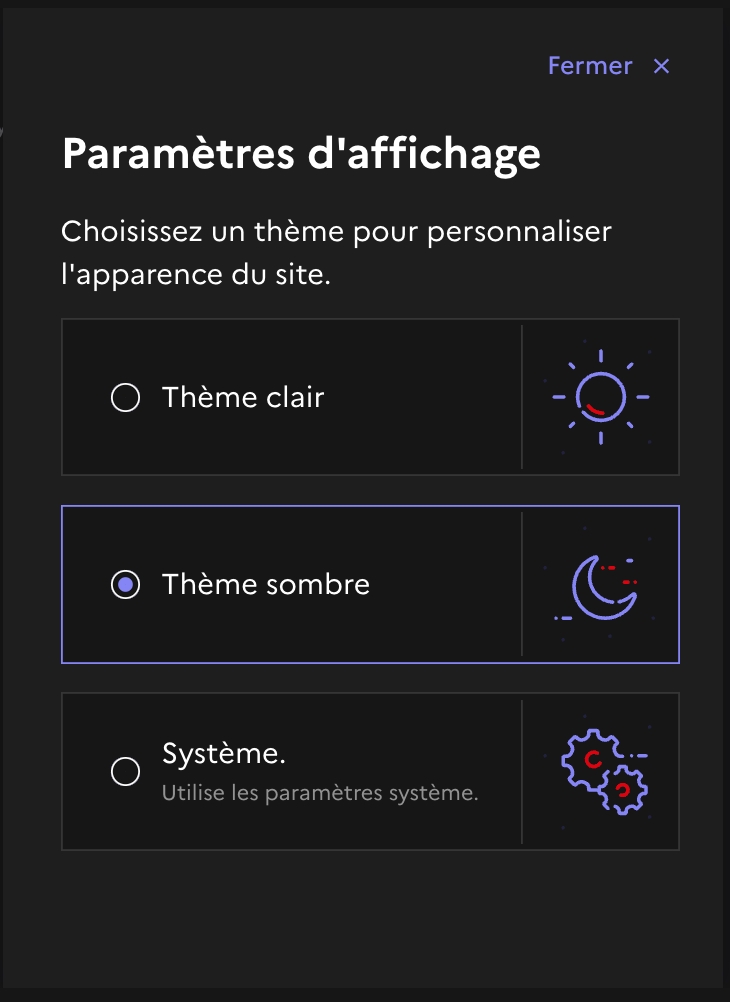
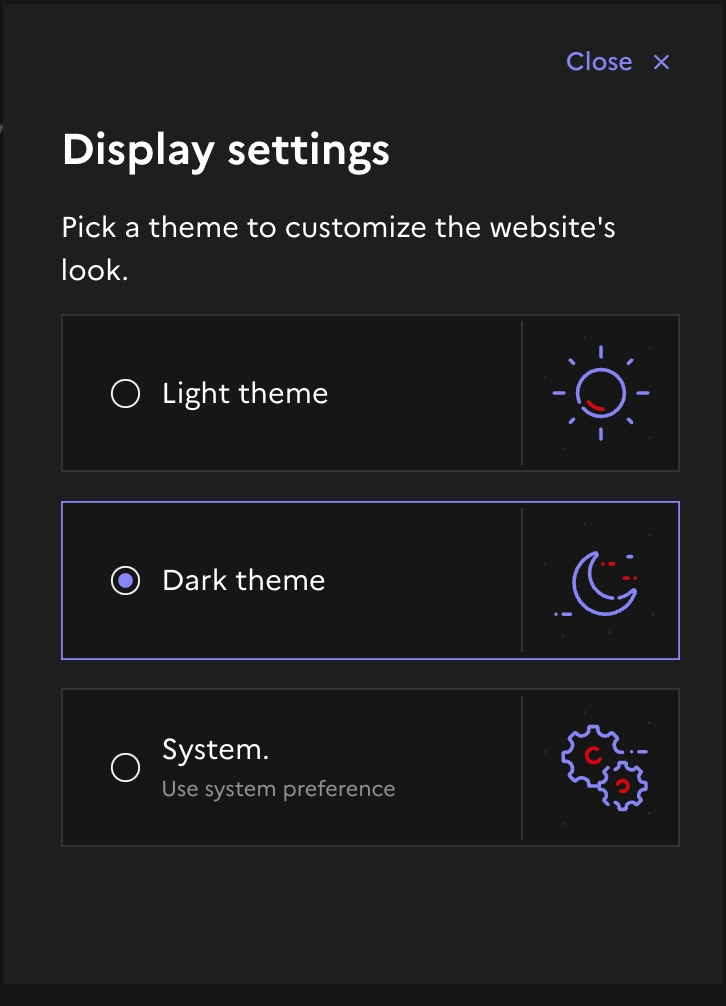
DSFR components contain hard coded strings.
These strings can be switched from a langage to another with a provider.
Integration with i18n libraries
DISCLAMER: I'm the author of i18nifty.
Assuming you have configured Next so that you have a lang prop provided to you in the main layout:
Assuming you have enabled internationalized routing:
It's up to you to replace in the following example "fr" by the desired locale using to tooling exposed by your i18n library.
You can add translation for extra language on a component basis, like so:
The above code adds chinese (zh-CN) support for the Alert component. You can call addAlertTranslations() wherever, just be sure it's evaluated before the first use of the component, here <Alert />.
You can also use this approach for overwiting the default text. Example:
When utilizing Next in App Router mode, it's crucial to accurately add or overwrite translations at the proper location.
For components that you use as server components, such as <Header />, <Footer />, or the <Display /> modal, you should make calls to addXxxTranslation within app/layout.tsx.
Example setup / In a SPA.
While I can confidently recommend it for SPAs, I have to warn you that using i18nifty in Next.js will force you to opt out from and bundle all your translations in the JavaScript bundle. SSR, SSO will work fine though.
The components usually come with one or two translations by default, typically english (en), spanish (es) and sometime german (de). .
For components used as client components, and those explicitly marked as client components like or , addXxxTranslation should be conducted in app/StartDsfr.tsx.
Add security to you application
react-dsfr supports strict Content-Security-Policy headers.
Add your Content-Security-Policy either by configuring your server, or with the meta tag.
Remember that a nonce MUST be generated per requests.
Add the nonce to react-dsfr
To get the nonce, you have to enable SSR with Vite and either inject the value in process.env or in a additional custom meta tag in your index.html. You can also infer it by using the content of the Content-Security-Policy meta tag if you configured the header this way.
For more information about SSR in Vite see the following page.
First configure the nonce in the <DsfrHead /> tag in your root layout:
The X-Nonce header is forwarded by the middleware.ts as suggested by Next.js.
It important to remember that reading headers in the root layout turns all pages to dynamic rendering opt-in. This is mandatory for nonce.
If you use the NextAppDirEmotionCacheProvider, don't forget to add the nonce to it accordingly to what Emotion and MUI needs: <NextAppDirEmotionCacheProvider options={{ "key": "css", nonce, prepend: true }}>
Then you have to tell react-dsfr to read and forward the nonce injected to all other scripts and styles by adding doCheckNonce: true; to the startReactDsfr() function:
Next.js with old Pages Router is not supported. As per Next.js suggests, we recommended migrating to App Router.
Create React App by itself is a way to build static sites which by definition cannot handle dynamic headers (like CSP) per request as no server will serve the pages.
Before getting into nonce configuration, you have ponder whether or not you need that level of security within your static app, and if so, choosing a solution to generate and inject the nonce into your app.
Once your injected the nonce into your app, add the following code:
Trusted Types are supported out-of-the box.
When configuring your CSP you only have to add our policy names to your list:
We register two policies with only the createHTML hook. Policy names are react-dsfr and react-dsfr-asap
You can configure a custom policy name if you need to by adding the trustedTypesPolicyName options to the startReactDsfr() function.
When a custom name is set, the suffix -asap is used for the second policy. Don't forget to add both to your header configuration.
Example:
If you set trustedTypesPolicyName: "my-app"
You header must be configured like so: trusted-types my-app my-app-asap;
This documentation is for .
The following assumes that you configured your CSP accordingly .
Your framework isn't supported? Let's !
Track your audience engagement and gain insights into how citizens interact with your website.
Message from the @gouvfr/dsfr team:
Activating it equips you with the capabilities to accurately track user interactions with your application, including specific buttons they click and pages they navigate. To comply with GDPR regulations, it's crucial to request user consent before implementing this detailed level of tracking.
Presented here is an illustrative example demonstrating how to initialize the Eulerian integration and solicit user consent for its usage.
You may refer to the documentation of the consentManagement utility via the following link:
To operate effectively, Eulerian requires certain parameters, which are provided upon initial registration on the Eulerian platform. This example includes only those. For a complete list and descriptions of accepted parameters, refer to the following link:
In-depth documentation elaborating on all these parameters can be found here:
For efficient tracking of interactions with various website elements, it's essential that each DSFR component is assigned a unique ID. This allows you to distinguish between different elements via the Eulerian dashboard metrics.
Each component of the react-dsfr toolkit can be explicitly given an ID prop. In the event you don't assign one, react-dsfr will make an effort to generate comprehensible IDs that aid in component identification.
La propriété de configuration enableRating, présente depuis la @gouvfr/dsfr:1.9.2, entraîne des envois de données très importants. Pour rappel, le modèle de facturation dépend du volume d'appels envoyés à Eulerian. Elle est retirée dans cette version @gouvfr/dsfr:1.10.2 (bundled with @codegouvfr/react-dsfr:). En remplacement, un attribut data-fr-analytics-rating peut être ajouté sur un élément dont on veut mesurer spécifiquement le taux de click. Il est important de s'assurer de la pertinence de chaque élément où cette fonctionnalité est activée afin d'optimiser l'envoi de données.
In the realm of analytics, the Service d'Information du Gouvernement (SIG) stipulates the utilization of . The vanilla JS/CSS module @gouvfr/dsfr, which powers this toolkit, is deeply integrated with the Eulerian platform.
Thank you for your willingness to contribute, here is the guide:
You want to publish your own library of components that depends on react-dsfr?
Here is an example:
I recommend starting from ts-ci for any project meant to be published on NPM
The main takeway:
Do not add "postinstall": "copy-dsfr-to-public" in your library's package.json. It's the responsability of the host app to do so.
If you rely on MUI, @mui/material @emotion/styled and @emotion/react should be peer dependencies as well. You should add those modules as devDependencies.
If you use TSS: react-dsfr dosen't need to be a peerDependencies but @emotion/react does, you do not configure the emotion cache in your lib, that's the the responsability of the host app.
Setup @codegouvfr/react-dsfr in your project or start from a template
If you already had the DSFR installed in your project, let's start from scratch:
Remove the import ofdsfr.css, dsfr.module.js the favicon and the fonts.
Remove the data-fr-scheme (and data-fr-theme ) attribude from your <html/> tag
And add this file to the root of your project, to enable pre & post scripts with pnpm:
When we say Yarn we usually refer to Yarn 1.x as most dev teams (Including me) havent upgraded to the newest version (for good reasons).
If you want to use Yarn Berry you be aware that pre- post- scripts aren't supported.
So you must do something like "dev": "copy-dsfr-to-public && next dev" (same thing for start)
Also you must configure it so it uses node_modules (sorry)
If you want a more complete starter with a Ready yo use stack that includes routing, autentication, internationalisation ect. you can also use this starter instead:
Add these three scripts to your package.json:
Trigger the execution of the postinstall script by running:
Add the following tags in the <head />
You're all set! Next step for you is to setup the integration with your routing library (react-router for example).
The create-react-app project is no longer being maintained. If you are starting a new project you'll probably be beter off with Vite.
Add these three scripts to your package.json:
Trigger the execution of the postinstall script by running:
Add the following code in the <head />
You're all set! Next step for you is to setup de integration with your routing library (react-router for example)
You can avoid having a flash of unstyled text by preloading the font variant used on your homepage (look in the network tab of your browser dev tools what are the font downloaded initially).
Add the following tags in the <head />
Add the following code in the <head />
. Any app that would use your library would need to explicitely install react-dsfr. .
Remove from your dependencies.
Using Nx monorepo? See .
This documentation is for (aka the legacy next setup).
Your framework isn't supported? Let's ! Note: We don't have a custom integration for it but react-dsfr has been reported working with .
Compatibility with solutions like styled-components, emotion and TSS.
This enables to write DSFR compliant CSS in JS code, since we are able to expose function that are the equivalent of the DSFR utility classes.
For ensuring the spacing between elements is consistent throughout the website.
The above code is equivalent to:
Which is in turn equivalent to:
For writing responsive UIs with media query (@media).
Using the theme object that holds the colors decisions and options.
This approad is React agnostic and yield the best performances.
Some third party libraries might require you to provide explicit value as colors.
When CSS variable references doesn't work you can do:
You can access the active mode (isDark: true/false) in the theme object. However, if you want to manually switch the mode, you can use setIsDark(true/false) .
If you want to use the isDark value in your styles:
It returns the values in pixel of the different breakpoint ("xs", "md", "lg", "xl") based on the current root font size.
It can be used to do stuffs like this, geting the number of column of a responsive layout in JavaScript:
Be carefull though, favor using fr.breakpoints over client size mesurement and computation.
On the backend you can't know ahead of time the size of the screen of your users so this kind of approach will result in a flickering in SSR setups.
For example, your backend has no clue the size of the device making the request so it renders for a 1080p screen but the device making the request was, in fact, an iPhone and the first print is fully broken, the app becomes usable only after hydration.
Long story short, use this only if you are building an SPA.
Setting up Storybook in your react-dsfr project.
Storybook is an open-source tool for developing and testing UI components in isolation, allowing you to create and refine components independently from the app's business logic.
If you use Storybook as an internal devloppement tool only. You don't need to customize much.
First follow the official instruction to setup Storybook in your meta framework of choice:
Here are the edit you need to apply to the default setup:
If you wish to publish your storybook as component library showecase you might want to go the extra miles and customize the Manager to add top level darkMode switch, load the Marianne font, provide a language switch ect.
If you want a fully DSFRised Storybook setup you can use this setup as reference:
Don't forget to add this extra dependency:
Lastly apply the following reference .storybook directory in your setup. Be sure to carefully merge the .storybook/main.ts so you don't overwrite specific configuration required by your meta framework.
How to import images, SVGs and other static DSFR resources
Let's see how we would translate this into React.
Use MUI components in your App or DSFRify your website build with MUI.
First of all you'll have to remove all usage of <ThemeProvider /> and createTheme() from your codebase (if any) then implement the following approach:
The demo setups for Vite, Next ans create-react-app all commes with MUI already setup. You can find aditional informations about this tool here:
In Next.js setup, on initial page load you may experience a few frames where MUI components aren't aware that the dark mode is enabled.
You can eradicate these few frames on subsequent page load by telling Next.js to perform SSR in the correct color scheme for the user:
Be aware that the API have changed since this video was recorded.
All demo setup are preconfigured with MUI installed. \
At build time react-dsfr parses the official files and spits out a typed JavaScript representation of the DSFR. In particular, its and , the and the .
Checkout .
You can use the style props on native react components but you won't be able to use the fr.breakpoint utility that enable to write responsive code.
tss-react
You can also use TSS to apply global styles:
Optionally, if you want to have access to isDark in your styles, but this is not nessesary because fr.colors uses CSS variables by default.
This tool is build using that is automatically generated from
This tool is build using that is automatically generated from
📣📣📣📣📣📣 There is at your disposal to help you pick your colors. Use it! It's great! 📣📣📣📣📣📣📣
Consider using the component instead of trying to manually manage the active mode.
For example is powered by Storybook. Let's see how to setup Storybook 8 in your project.
Let's say, , you come across the following HTML code.
Most JS bundlers, by default, emits a separate file and exports the URL when comming across an import of a image or video file format.
In modern Next, if not explicitly disabled, image files (including SVGs) are imported using .
You'll get a valid url by accessing the src property of the react component.
react-dsfr features a DSFR theme for MUI. This enables you to use the in your website, they will blend in nicely.
If you have in your MUI theme implement the following approach.
Be aware: this will opt you out, every hit of your website will trigger a complete render on the backend, so it probably isn't worth it unless you have already opted out from static optimization.
I made tss-react in coordination the MUI team. (TSS is documented in the MUI documentation and ) so it works very well with it. Besides, getting MUI to correctly SSR in a Next.js setup is complicated (). With the help of TSS, .
and are equivalent API-wise so I give the example with Emotion since it has a better MUI integration.